Plan Track Revise - Android Application Quick Guide
Extract from the original help guide
The following is a guide to installing and using the PlanTrackRevise Android™ Timesheet Application. This application can only be used in conjunction with an account set up on PlanTrackRevise.com, and you will need to have a connection to the internet in order to use it.
Installing the Application on your Device
On your device use the Android Market application to search for "PlanTrackRevise" and then click on the install button.
Alternatively, you can visit our page on the Android Market website.
Logging In
The PlanTrackRevise Android Timesheet Application needs to connect to your account on PlanTrackRevise.com. When you first start the application you will be asked to sign into your account using your email address and password.
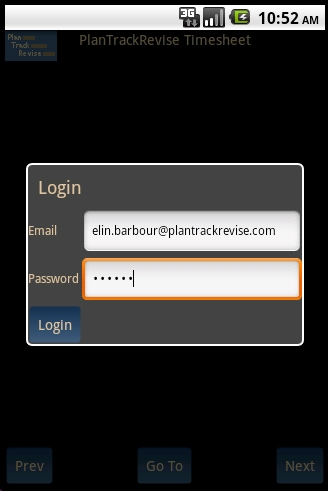
Enter the email address and password that you use to sign into PlanTrackRevise.com and then push the [Login] button. Please note that you will need to have logged onto the PlanTrackRevise.com website at least once before you can use the application. After you push the [Login] button the application will attempt to connect to PlanTrackRevise.com.
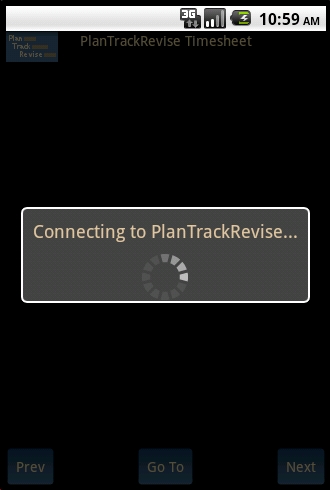
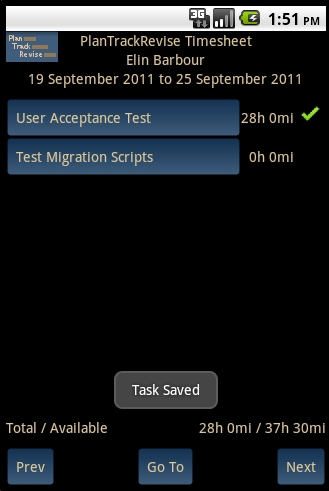
If the application successfully connects to PlanTrackRevise.com then you will be shown your timesheet for the current date. If there is a problem connecting then an explanatory message will be displayed and you will be asked to login again.
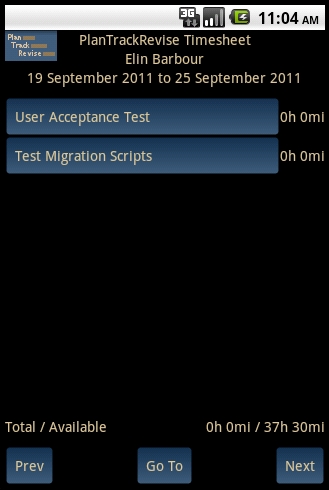
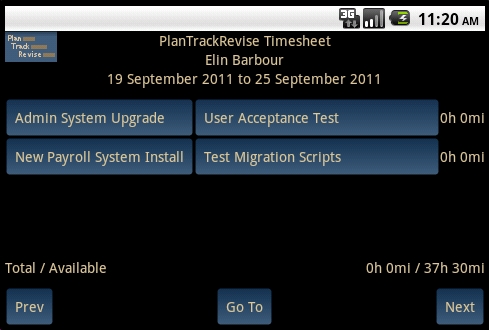
Your current timesheet will display any tasks assigned to you that are due to be started before or during the timesheet period. You can change this to also display any tasks that are due to be started in the future - please see the "Changing the Settings" section below.
If your device is capable of detecting an orientation change then changing to a horizontal view will show the same timesheet with the project names also displayed for each task.
Entering Times
To enter times in the current timesheet push on the task name that you want to enter the time for. The task details will be displayed.
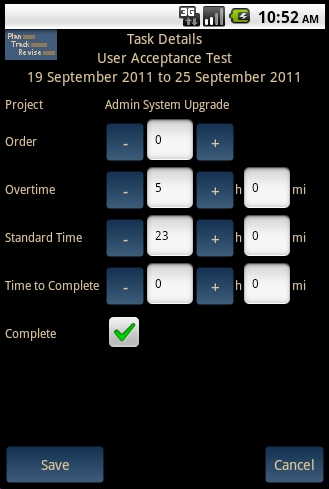
Within the task details the following information is shown for the task that was selected.
The task name and timesheet dates in the title.
"Project" - the project in which the task exists.
"Order" - the order in which the task was worked on in the timesheet period. This field is optional. If it is set to 0 then the planned order will be used.
There will then be a row for each "Charge Band" that you can enter time against. Depending upon how your user has been set up there will be one or more rows. In the above screen shot you would be able to enter times against "Overtime" and/or "Standard Time", these names may differ for you. Enter the time that has been worked in the timesheet period in these fields.
"Time to Complete" - the time that you estimate that it will take you to complete this task after this timesheet period. This field is optional and should only be set if he task has not been completed.
"Complete" - check this checkbox if the task was completed during this timesheet period.
Some of the fields have [-] and [+] buttons for decrementing and incrementing the values. Push these to quickly change the values in those fields. If you push and hold one of these buttons then the value will keep on decrementing/incrementing until you let go.
Push [Save] to save the changes that you have made. The application will connect to PlanTrackRevise.com to update your timesheet and then return to the Timesheet view.
Push [Cancel] to return to the Timesheet view without saving any of the changes that you have made.
Changing the Timesheet Displayed
When viewing a timesheet you can use the [Prev] and [Next] buttons to change to the previous or next timesheets. You can also do the same thing by swiping your finger across the screen. Left-to-right for the previous timesheet and right-to-left for the next timesheet.
Another way to change the timesheet is to push the [Go To] button. On doing so a new dialog box will be shown.
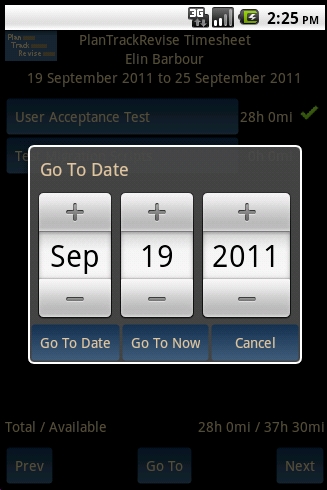
In this dialog you can set the desired date and then push [Go To Date] to change the timesheet to the one on that date. Alternatively, you can push [Go To Now] to select the timesheet for the current date. If you push [Cancel] then the "Go To" dialog will be closed without changing the timesheet displayed.
Changing the Settings
You can access the settings for the application by pushing the menu button on your device and then selecting "Settings". Please note that the options available on the menu may differ, depending upon how your user has been set up.
The settings will then be displayed.
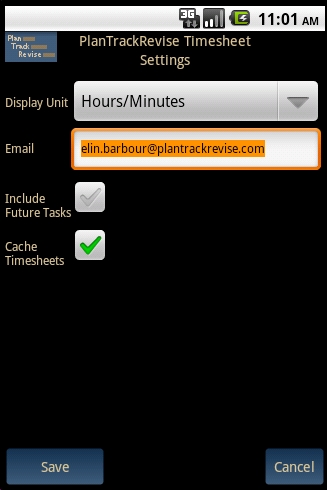
This page allows you to change the following settings.
"Display Unit" - the unit in which times are entered and displayed. This can be one of the following values.
Hours/Minutes
Days/Hours
Weeks/Days
Months/Days
Months/Weeks
Years/Days
Years/Weeks
Years/Months
"Email" - the email address with which yout connect to PlanTrackRevise.com. If this is changed then you will be asked to login again as the new user.
"Include Future Tasks" - when checked all uncompleted tasks will be shown on your timesheets even if they are not due to start until sometime after the current timesheet period. When unchecked only uncompleted tasks that were due to start before or during the timesheet period will be displayed.
"Cache Timesheets" - when checked the application will keep a copy of your timesheets on your device and so will not have to connect to PlanTrackRevise.com if the timesheet has already been downloaded. When unchecked the timesheet will be refreshed from PlanTrackRevise.com each time, regardless of whether it has been displayed before. If you do cache your timesheets you can refresh them from PlanTrackRevise.com by selecting the "Refresh" menu option (see below).
Push [Save] to save the changes that you have made to the settings, you will then be returned to the Timesheet view.
Push [Cancel] to return to the Timesheet view without saving any of the changes that you have made.
Other Functions
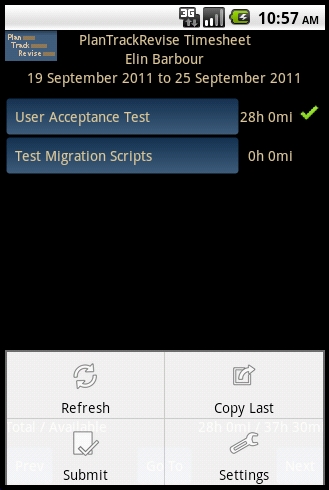
The following functions may also be available when you press the menu button on your device. Please note that not all of these may be available, depending upon how your user has been set up.
"Refresh" - refresh the current timesheet from PlanTrackRevise.com.
"Copy Last" - copy the time entered values from the previous timesheet. The application will always connect to PlanTrackRevise.com to do this. Please note that the time entered values for completed tasks will not be copied.
"Submit" - submit the current timesheet. This menu option will only be available if your user account has been set up so that you can submit your own timesheets, without managerial approval.
"Un-Submit" - (available only when the current timesheet has been submitted) un-submit the current timesheet. This menu option will only be available if your user account has been set up so that you can submit your own timesheets, without managerial approval.
"Settings" - change the application settings. See the "Changing the Settings" section above.
Android is a trademark of Google Inc.